|
Over the summer, I began work on my biggest model project yet, the Perfect Grade Millennium Falcon made by Bandai. This kit is what those of us in the hobby call a "Grail" kit, as in the big, most desired kit of the most popular subject. Obviously, the Millennium Falcon is a character in itself and has countless model kits based on all the different versions from the different movies. This one, however, is the most detailed and biggest mass-produced kit you can buy of the Falcon. Based on the filming model from the original Star Wars, there are an insane amount of parts on this kit and the box is huge! After I got this kit, it sat in my garage for a long time. I had many excuses to not get it out: too time-consuming, other kits I wanted to do first, and any other excuse you can name. In reality, I was scared. I wanted this to be perfect, and I was scared that I would mess it up and irreparably ruin the final product. Thanks to the pandemic this year and the shutdown of much of our economy, I decided I did not really have an excuse to put this off anymore. I was most of the way through my stash of kits, and the time seemed right. Because of the size and length of this build, I will be posting build diaries through each of the major steps. Today's focus is the cockpit and the figures that go in the cockpit. I was not totally satisfied with how the lighting in the cockpit turned out, but I am happy enough to let it go. For me, the focus is on the rest of the ship, and I probably will not have the cockpit light unit turned on a lot of the time. There are a lot of really excellent builders out there who turn their cockpits into an incredible labor of love and skill. I am not one of those builders, but I am glad I put the time into improving it just a little.
Next up: Starting the Sub-Assemblies.
1 Comment
 Solo will likely never be remembered as the best Star Wars movie for a variety of reasons, but I thoroughly enjoyed it, not least because it gave us a new version of the Millennium Falcon. The number of Millennium Falcon kits on the market is vast, and there are many versions in many different scales from the tiny Bandai 1/350 version up to the amazing Perfect Grade 1/72 scale version from A New Hope. I have the big box Bandai Perfect Grade version sitting in my stash, but I cannot quite bring myself to build it yet out of some elusive idea of needing it to be perfect. One thing the other models of the Falcon do not have is the unique coloring and style of Lando's version. This difference and the smaller size drew me to this kit as a potential stepping stone to the big one in the future. 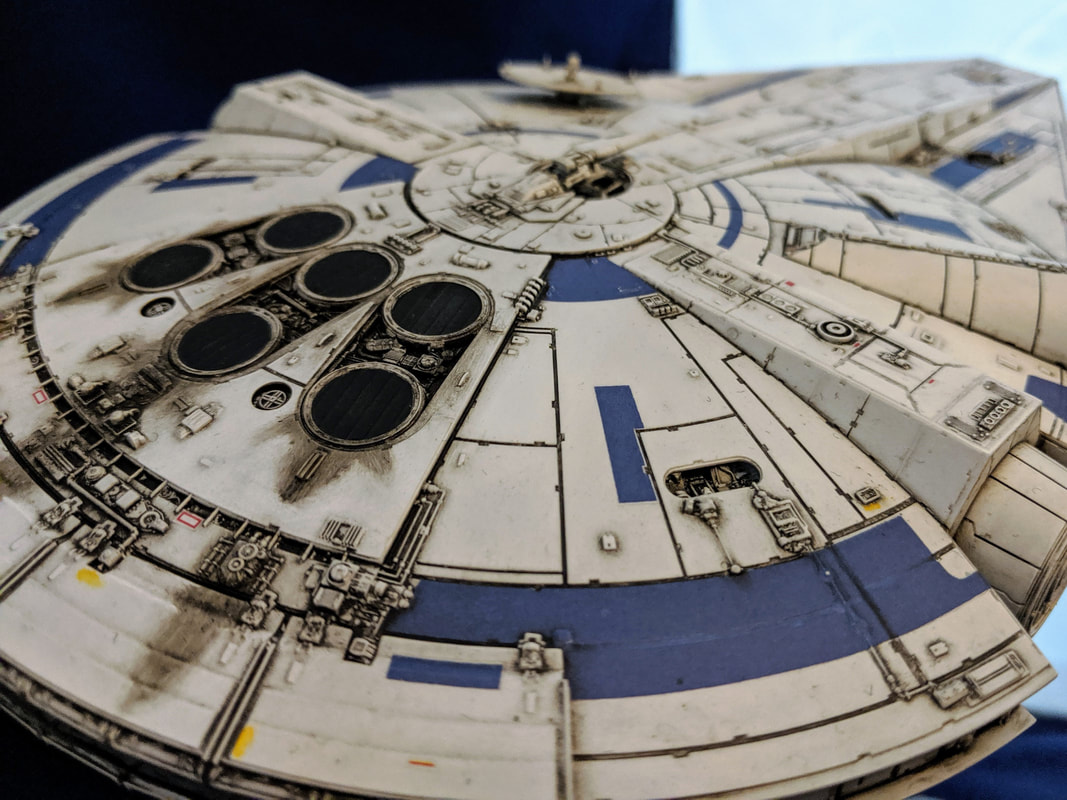 This 1/144 scale kit was a pretty standard build from Bandai. Easy snapfit parts and great engineering make all of their kits fun to build. As I think I have written before, the decals are one aspect of Bandai kits that I am less impressed with so I found a great set on eBay from user yogurt80. I do not believe he has any Lando's Falcon sets available right now, but he makes a lot of great sci-fi decals. 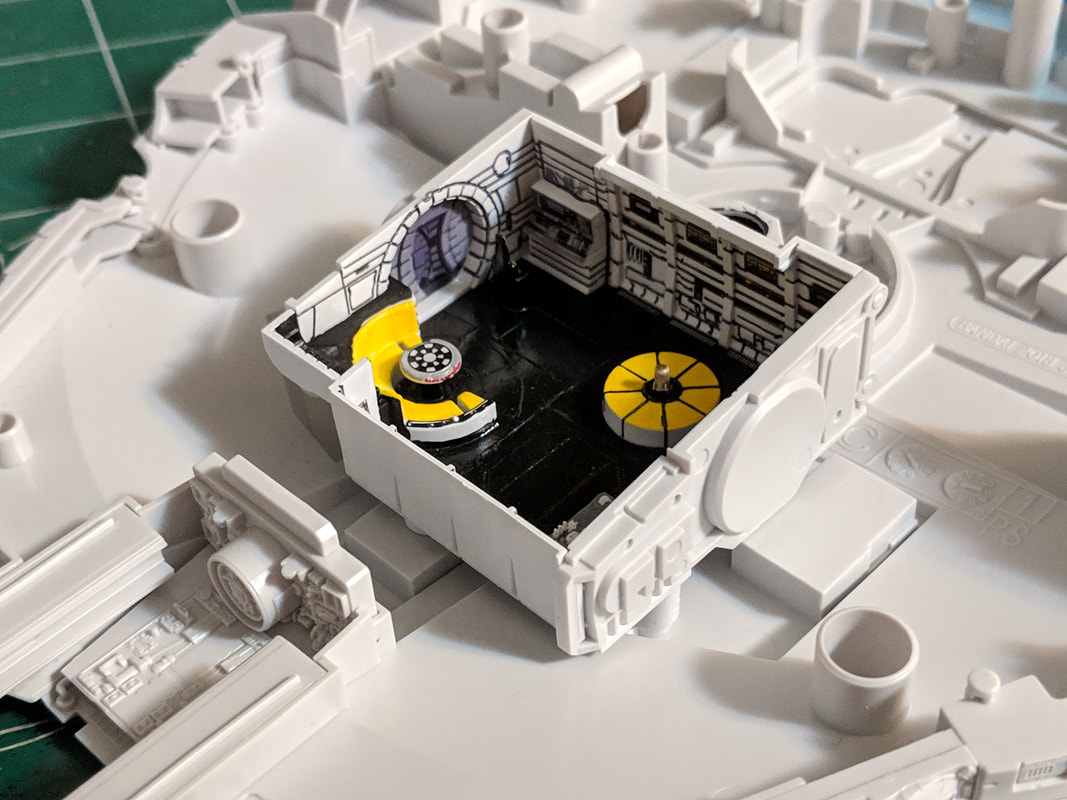 One of the fun parts of this kit was the small inside portion of the ship. I ended up painting a lot of this because even high quality decals had a hard time with all of the crevices. Ultimately, this part is not visible in the final display of the model, but I had fun with it. 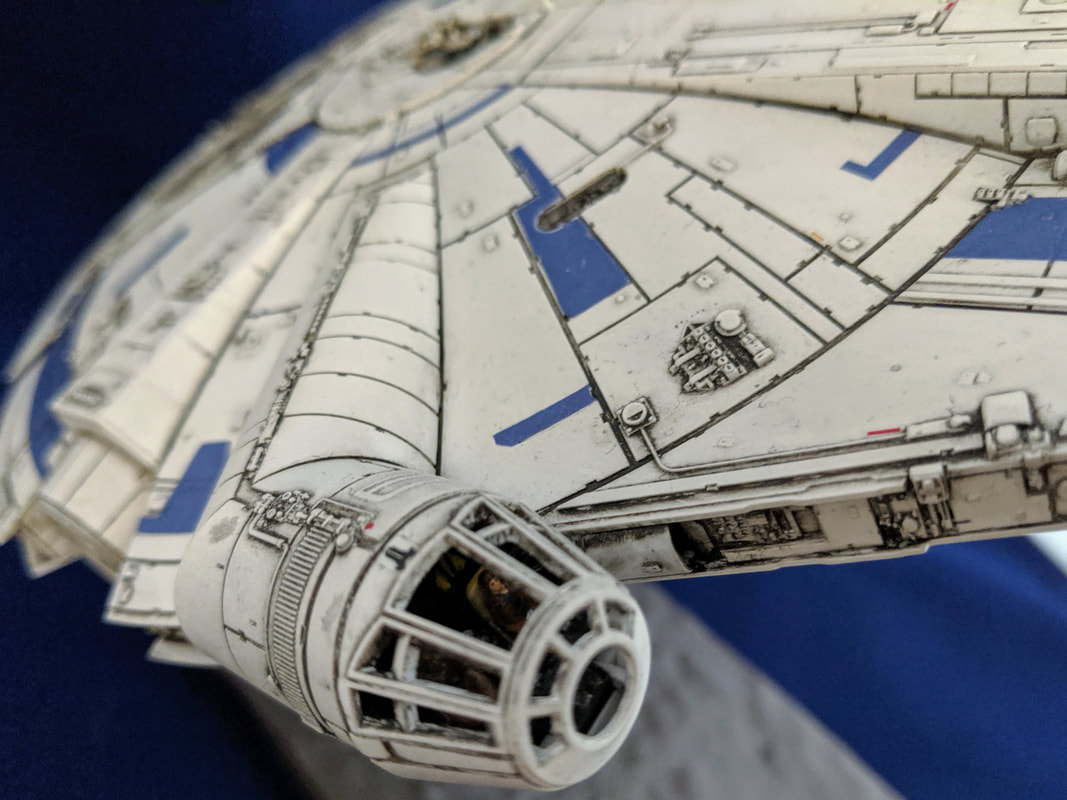 Another challenge for painting was the tiny cockpit figures, which include Han, Chewie, and Lando. In this picture you can just barely see Lando sitting in the back behind Han. Figures in 1/144 scale are difficult to paint well! At least any imperfections are hidden by the cockpit! On the subject of the cockpit, this kit does not come with any clear window parts, but a few of them would have been so small, I can see why the open cockpit makes sense. 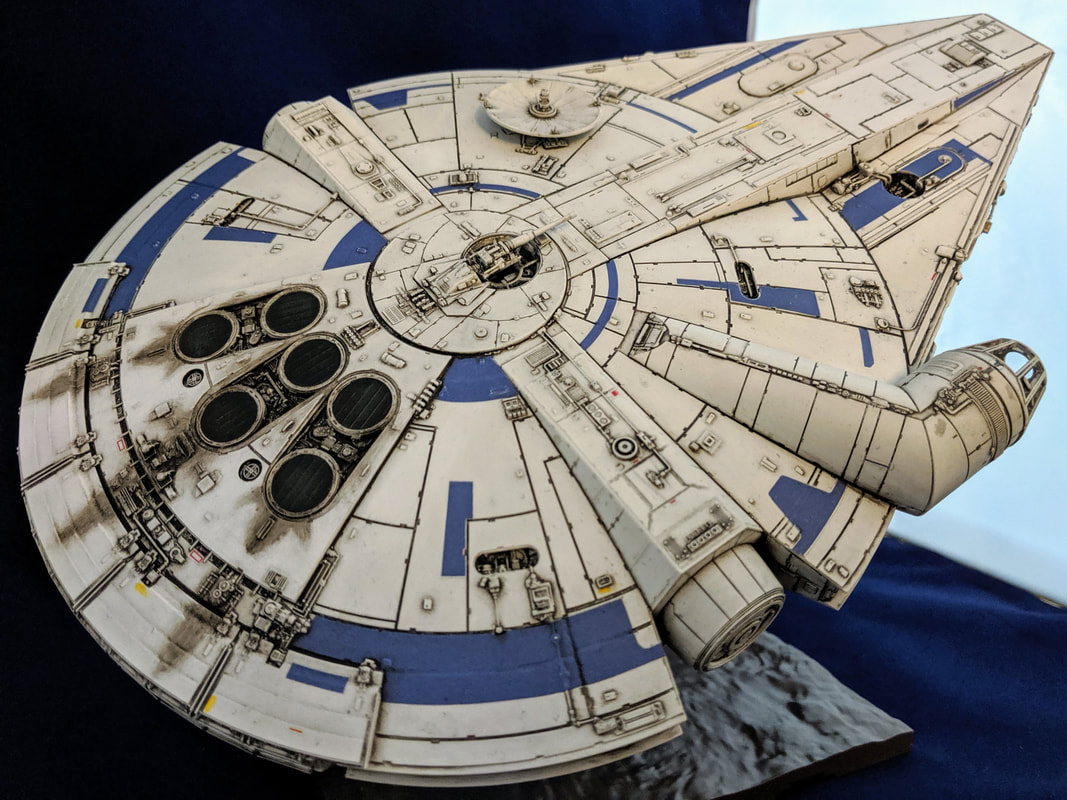 I did not do a large amount of weathering because Lando likes to keep his stuff in top shape, so I did a basic oil wash and then used some oil brushers for the engine exhaust. The final look gives it the just barely used and kept in decent shape look. I was pretty happy with the final results. 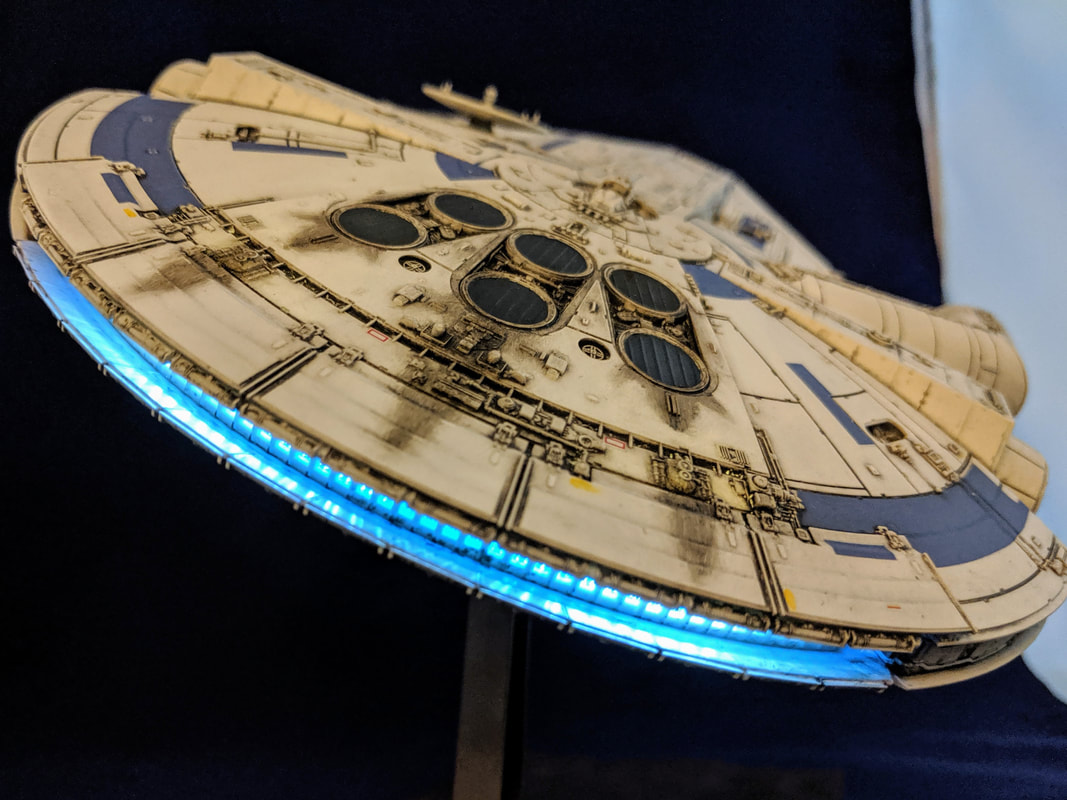 Finally, I bought one of the basic lighting units from Bandai for the iconic blue engines. There is an access panel on the bottom of the Falcon, and I love the look with the engines turned on. It is easy to install, and while definitely not the highest quality lighting unit, it does the job well enough for me.
Quick note for those interested in building this kit. There is no landing gear included, so you will have to scour the internet to find a set. I know there are several out there, but I tend to prefere in flight displays on my models. For Christmas last year, my wife bought me one of the Han Solo Nerf blasters. Check out the picture below for what they look like. Pretty ugly. 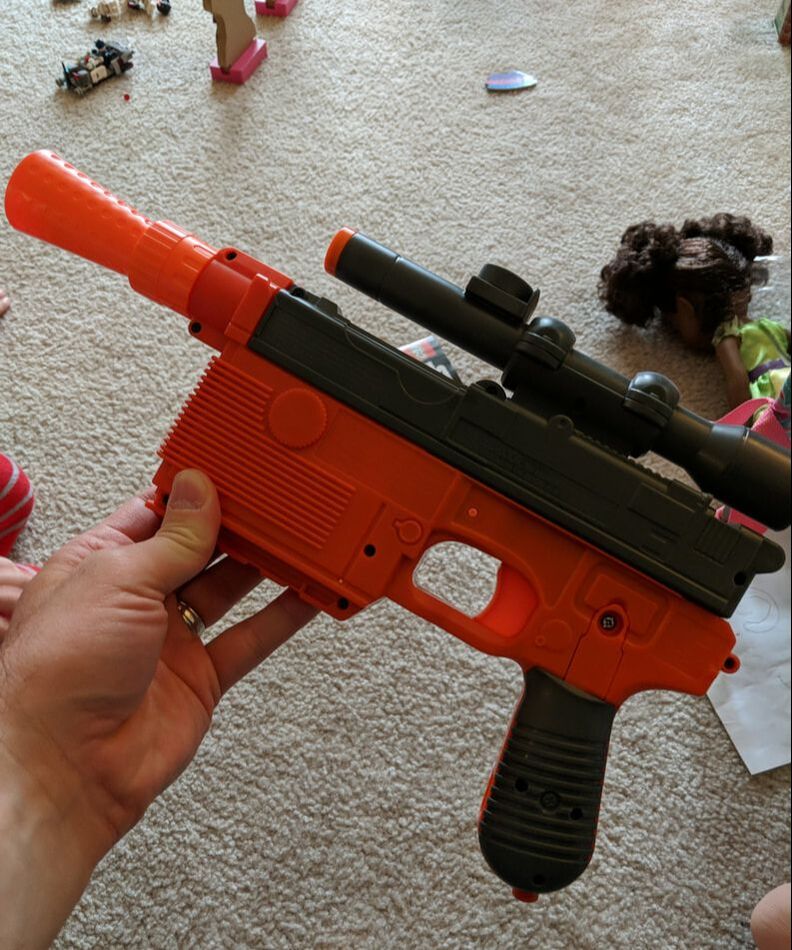 Of course, as soon as I saw it, I envisioned a project. I have seen a few people on Instagram and Youtube doing mods on nerf blasters, so I decided to try it myself. The job was actually one of the quickest and easiest jobs I have done in a while. First, I masked off the clear parts where you can see the inner lights and then primed the whole blaster with Vallejo black primer. Next, I used Vallejo Model Air Metallic Black on the entire blaster. I like the Metallic Black color for the glistening effect it gives. Second, I masked off the area around the handle and sprayed on Vallejo's wood brown paint. In order to give it a slightly darker tone and look a little more handled (pun intended), I gave the handle a dark brown wash. Finally, I used silver paint to dry brush key areas around the blaster to show extra wear and tear, particularly on the blaster tip. Overall, the whole project took maybe a week, mostly in paint drying time. Check out the picture below for the final result. It looks great and still makes a great toy to play with my kids! 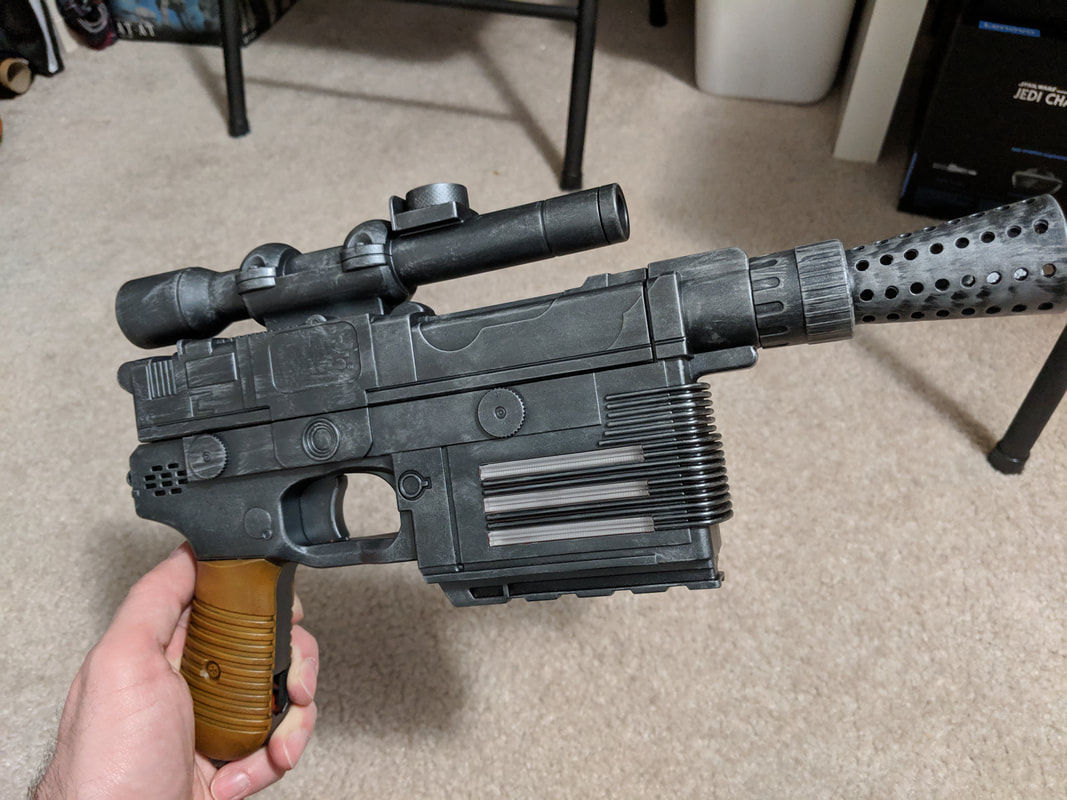 |
AuthorModel builder, board gamer, and all around lover of small scale stuff. Archives
March 2021
Categories
All
|
 RSS Feed